In the first of a two-part feature,
Dick Taylor looks at
Iraqi Ground Forces Unit Organization
and Vehicle Markings in both Gulf Wars.
Part One: 1990-1991
This is a complicated subject and one, if 1 were to do it full justice, would require a book, not just an article or two. Little seems to have been published about the Iraqi forces in the Gulf War of 1990-91, and my research has revealed a huge and complicated topic. I will, therefore, not attempt to pass on all the information at my disposal, but instead try to give a flavour of how the Iraqis marked their vehicles at the time of the ‘Mother of all Battles‘.
In Part Two, I will consider Iraqi vehicle camouflage and markings seen during Operation Telic in 2003. Let’s set the scene. Most people are, I’m sure, familiar with the two major components of the Iraqi ground forces. First, there is the better-equipped Republican Guard Forces Command (RGFC), a corps-sized organization with seven or eight divisions. The Republican Guard (RG) used names rather than numbers for their divisions. Secondly, the Iraqi ‘Regular’ Army (RA) -a mainly conscript organization -of seven corps and about 50 (numbered) divisions.
These divisions can be armoured, mechanized, infantry and, in the case of the RG only, special forces. The basic outline of the RGFC is shown in Table 1. It should be noted that the vast majority of the T-72Ml tanks were to be found in the RG armoured divisions, along with the BMP-1 and 2 Infantry Fighting Vehicles (IFV). These formations did still use some of the older equipment, for example MTLB gun tractors3 and BTR-50 command vehicles. The initial invasion of Kuwait started between 0245-0300 hours on the morning of 2nd August 1990.
The three RG armoured/mechanized divisions crossed the border and cleared the northern half of Kuwait to the Mutla ridge in a matter of hours. By midday they were in Kuwait City and destroying the only opposition that the Kuwaiti-armed forces could muster, mainly some British Saladin armoured cars. An air assault by Iraqi special forces was mounted with the intention of capturing the Emir and his family, but this failed because the royal family had escaped. With the immediate objectives secure, the RG infantry divisions reinforced the armour. The Kuwaitis mounted stiffer resistance over the next couple of days, basically a fighting withdrawal to the Saudi Arabian border, but by the 4th August the Iraqis were in effective control and the reinforced RA [LI Corps began to move in to conduct a ‘relief in place’, allowing the RG formations to withdraw back into southern lraq, just outside the national boundary. The Ill Corps organization changed as divisions were attached and detached over the next few months, but the ‘usual’ organization looked like Table 2.
Other RA formations were then moved into Kuwait, and by 16th January, when the bombing campaign began, the II, IV, and VII Corps were all inside Kuwait; Ill Corps formed the Iraqi left flank, holding Kuwait City and the area to the Saudi border; IV Corps held the centre from the City to the Wadi al Batin, and the right flank was the responsibility of VII Corps; II Corps formed the rear in southern Iraq with counter-attack options into Kuwait, and I Corps and Vl Corps inside Iraq secured the Iranian border. A total of about 470,000 -500,000 Iraqi combat troops were available in the order of battle of the combat divisions, though not all of these were inside Kuwait. Some 4,300 tanks of various types, 9,000 APC/IFVs and 3,500 artillery pieces were deployed. Ill Corps’ 3rd Armoured Division was unusual for an RA unit in that as an ‘honour’ division, it was regarded as ‘battie hardened’ and reliable, and its T-55, T-59 and T-69 tanks had largely been replaced by T-72 and T-62M vehicles.
It was this formation, in the process of changing posi lions with the 5th Mechanized Division, made a night-time navigational error during the night of 29th January, and accidentally invaded Saudi Arabia! The T-62 tanks of 3rd Armoured Division’s 6th Armoured Brigade stumbled into the USMC positions in the area of Al Wafra, where they were quickly driven back. (The fact that the Brigade’s T-62s had their guns over their rear decks indicated that they were conducting a non tactical move, and were not expecting to fight. Further deliberate incursions into Saudi Arabia by the 5th Mechanized Division’s 15th Mechanized Brigade occurred in the area of Al Khafji the next night, but the brigade could not be rein forced despite efforts by the remainder of the division, and thus the 5th Mechanized Division was rendered largely combat ineffective.
However, it was still able to engage the tanks of the USMC tanks a month later, in the area around Kuwait International Airport, a tribute to the resolve of at least some of the Iraqi armed forces. When the Coalition ground offensive hit the Iraqi positions on 24th February 1991, about 15 Iraqi divisions faced the immediate onslaught. Most of these had been badly worn down by the air campaign, and morale was low.
The orientation of their vehicles was generally incorrect, as the Coalition had fooled the Iraqi leadership into believing that attacks would come from the sea in the East, and directly up from the South in the West; the hook from the West completely took them by surprise. Many of the Iraqi tanks were subsequently found to be immobile, with unserviceable engines or even no engines at all! (This causes the vehicle to ride high on its suspension at the rear, giving a nose down attitude). They were, in effect, pillboxes, and although dug-in to hull-down positions and thus protected they could not manoeuvre. Indeed, many tanks had also had all their external fuel tanks removed, whether to help prevent fires or to stop the crews deserting their positions is not clear, but as this also applied to the T-72s of the more reliable formations, the first explanation may be more likely. (Most of the Iraqi tank force had some or all of the hull stowage bins removed as well, for unknown reasons. (See photo A).
Splash plates on the glacis of tanks were rarely seen and there is a body of opinion that the Iraqis deliberately sacrificed older tanks and artillery systems to air attack, and kept the newer and more effective equipment better hidden. After the campaign had finished, the USAF alone claimed 40,000 armoured vehicle kills. (Typical pilots!)
Estimates taken from counting ‘dead’ vehicles later revealed the more realistic figure of 3,800 tanks and armoured vehicles destroyed, both from the air and ground. Current estimates of Iraqi personnel casualties vary from 10,000 to 30,000.


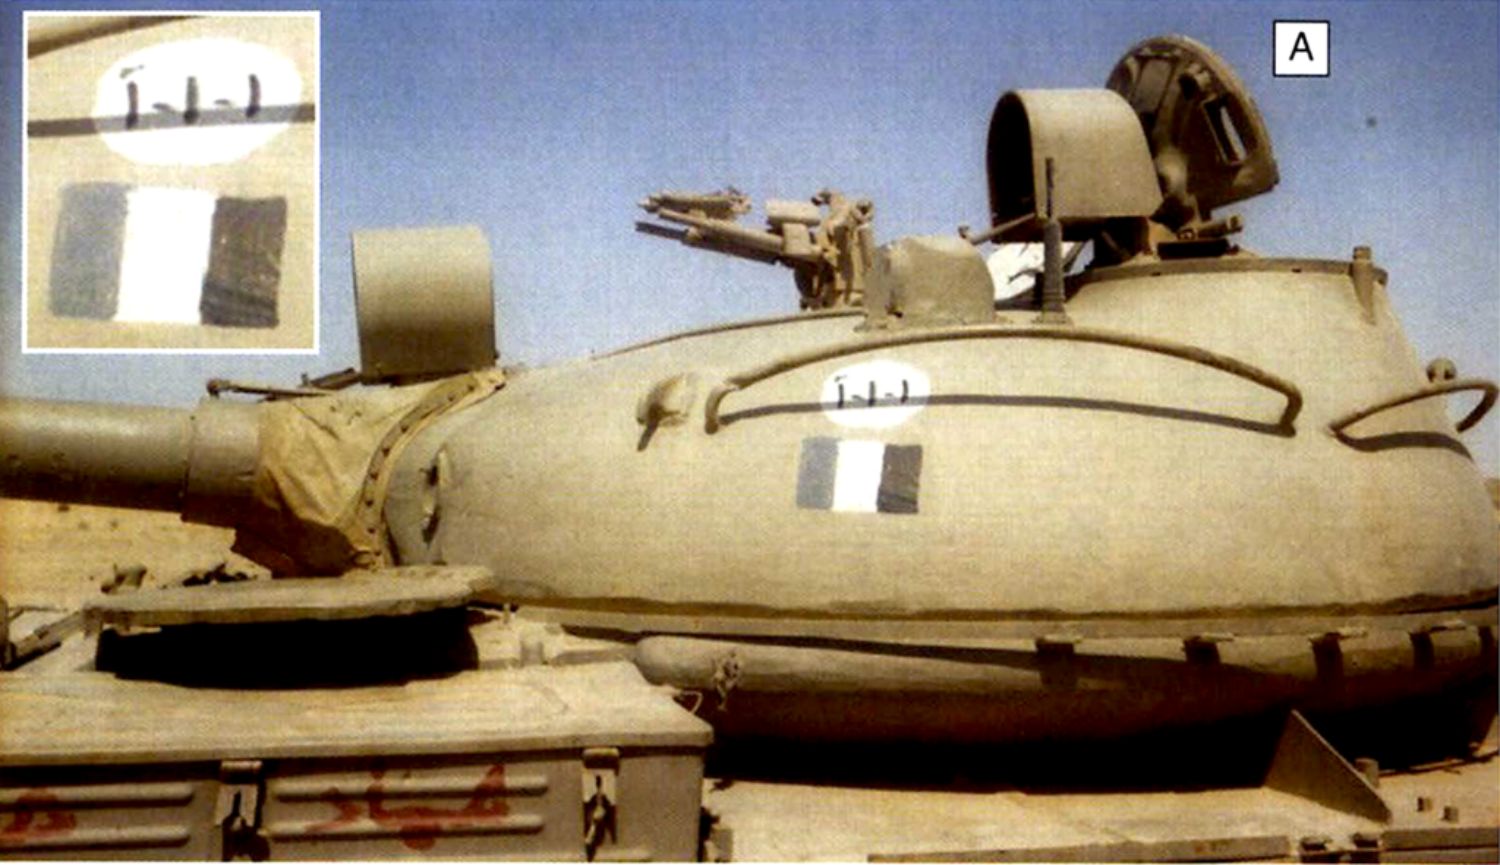
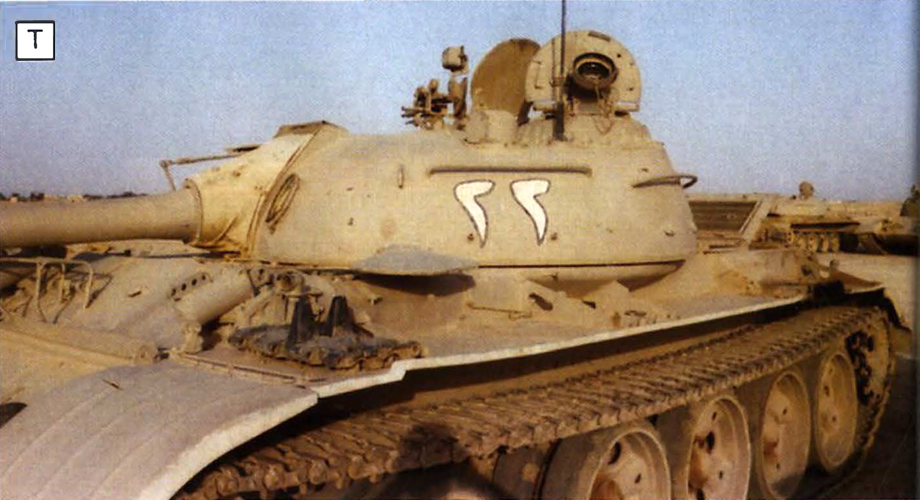
A.Typical positioning for markings on tank turrets shown on a T-62


B.The Iraqi Armed Forces device.
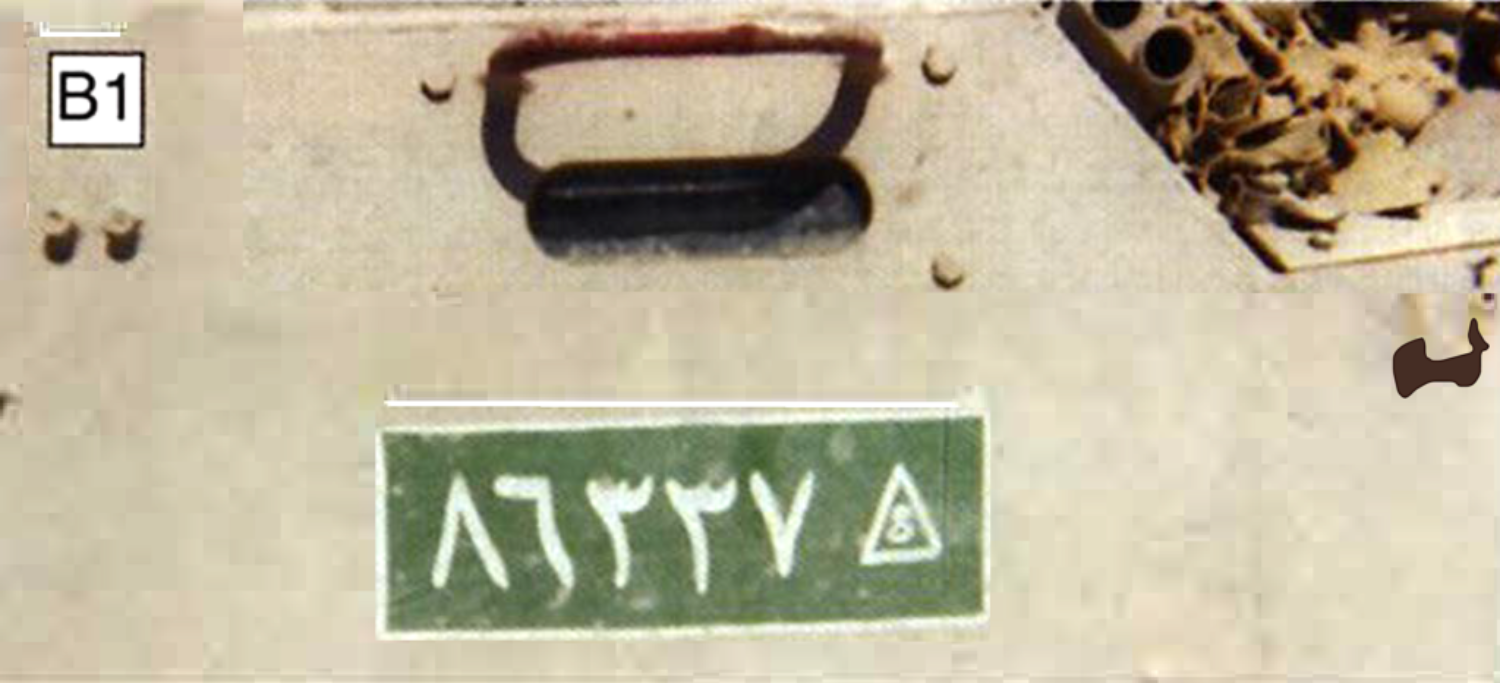
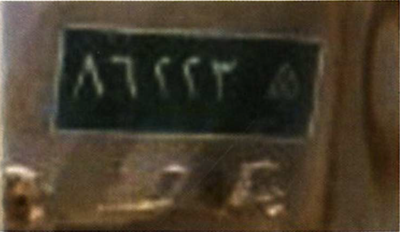
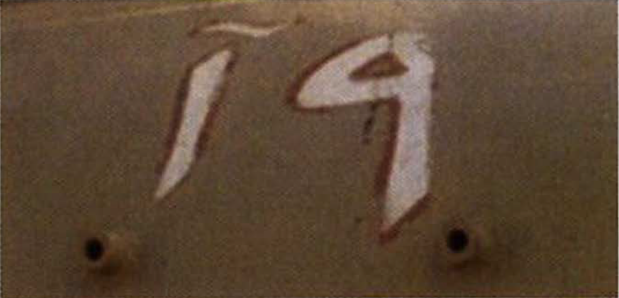
B1. Close up of the number plate style with white characters on a green plate -all faded!
Vehicle Markings
Now onto the markings and please note that all paint references given here are approximate. The one marking that was invariably to be seen on all vehicles was the registration plate, displfed front and rear. This was a grass green rectangle (similar colours are Tamiya Park Green X28, Humbrol Gloss
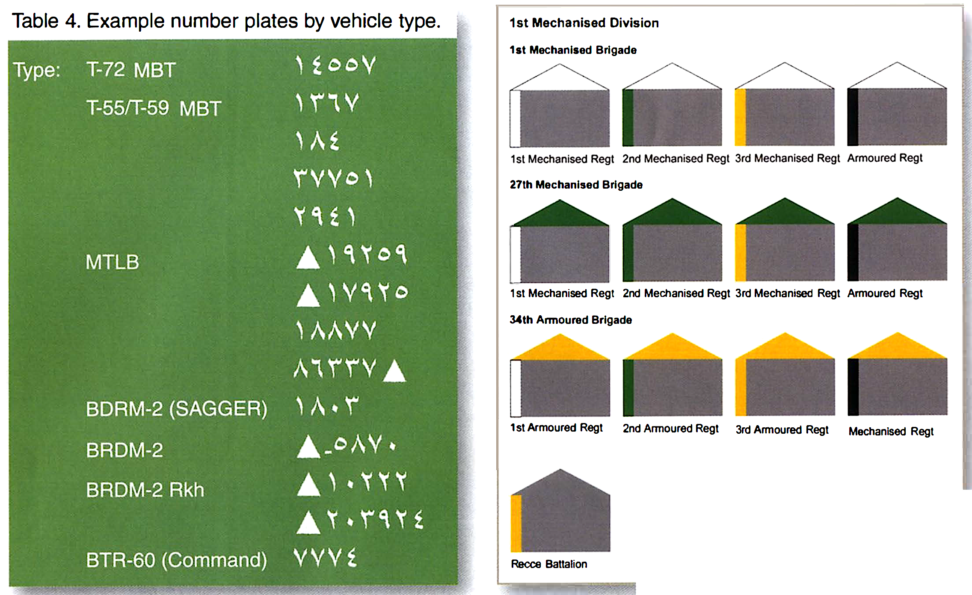
Emerald 2), generally with a white border, with between three and seven Arabic numerals (never letters), and often carrying a stylized version of the triangular Iraqi Armed Forces’ device, either as the first or last character. This is shown in photos B and Bl, and Arabic numbers are shown in Table 3.
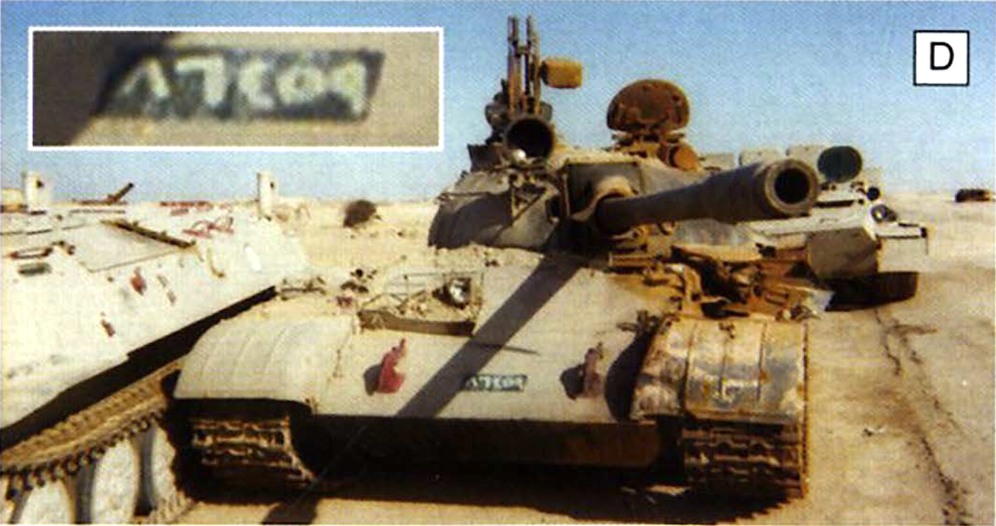
D. Number plates on tanks were usually on the upper or lower glacis plate.
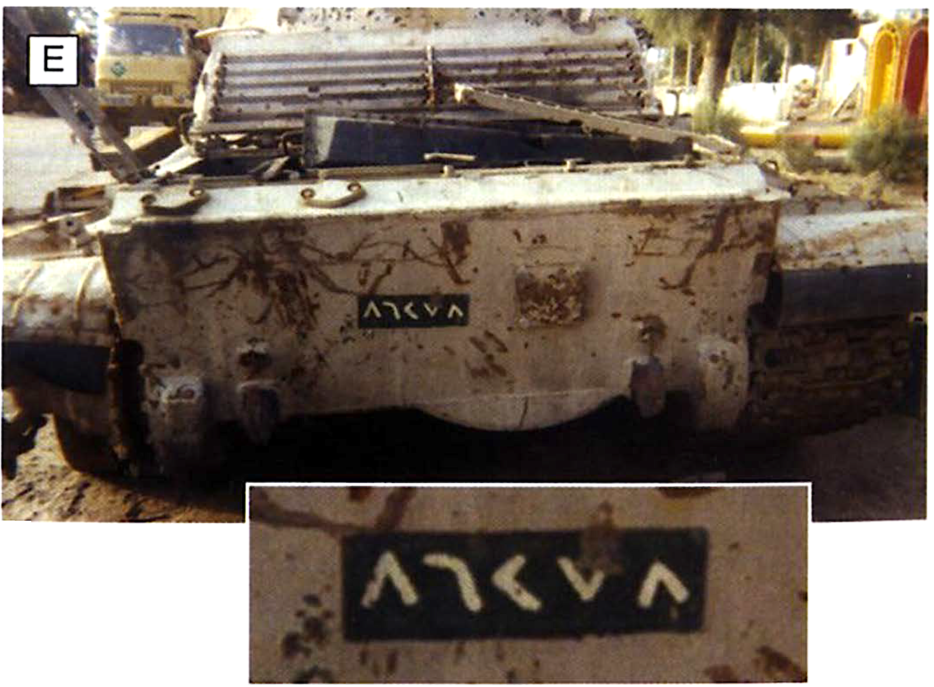
E. The rear plate of a T-62 shows the typical position of a vehicle number plate for this type.
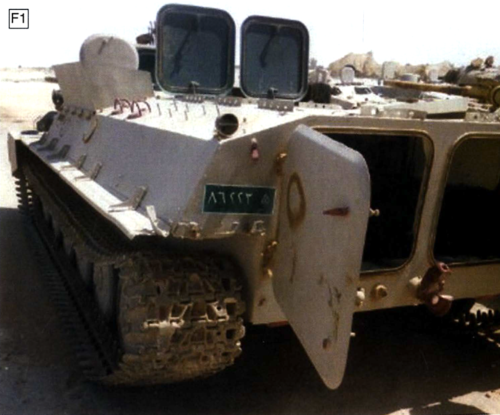
The dimensions of the registration plate are approximately 13in x 6in (325mm x 150mm). Plates could be either painted directly onto the vehicle, or take the form of a metal plate bolted, screwed or riveted on. It is impossible to be too dogmatic about the exact location of the plate. For example, on the front of tanks it could be mounted on the top or on the underside of the glacis plate. At the tank’s rear it would be somewhere on the rear plate. (See photos D and E). On MTLB fronts it could be on the underside of the glacis, on one mudguard or on both ‘cheeks’ (Photos Band F); and to the side of the doors at the rear. (Photo Fl).
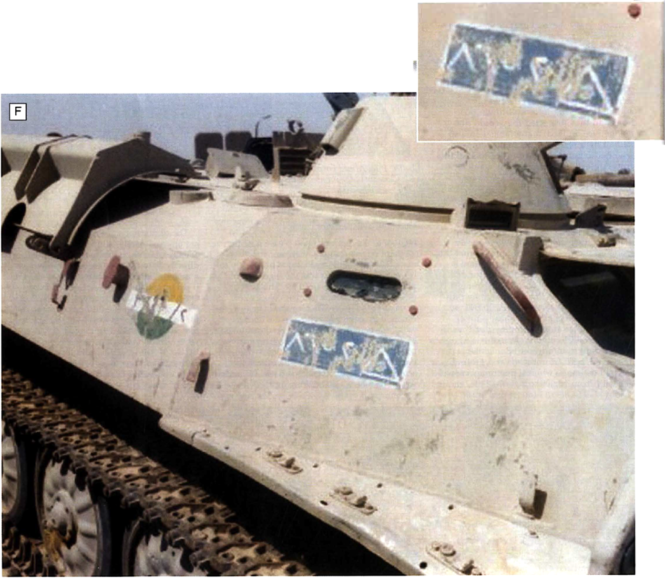
F. MTLBs had their number plates on the front side armour.
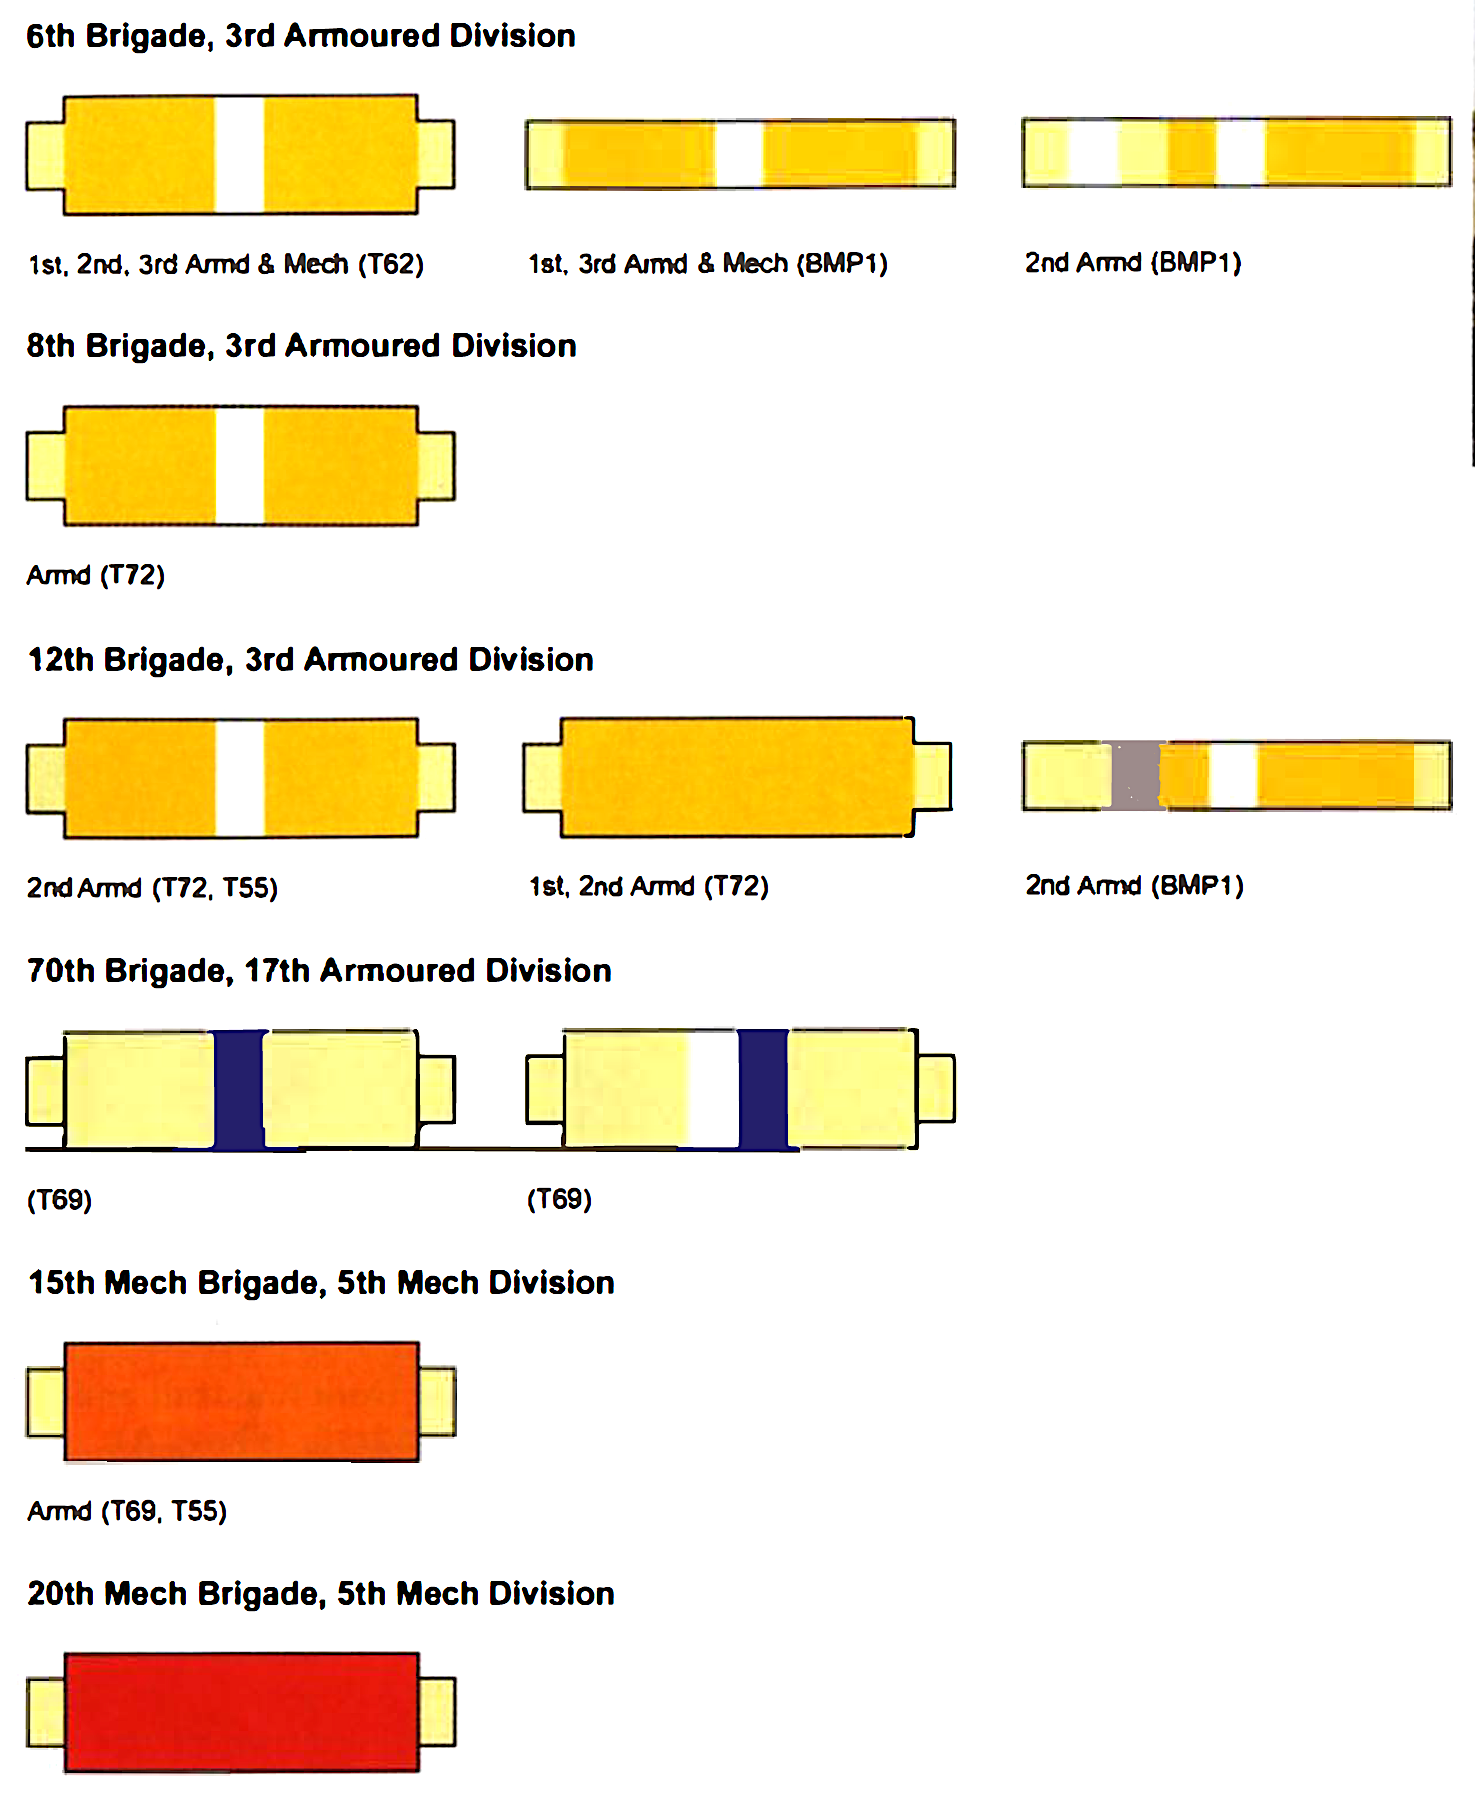
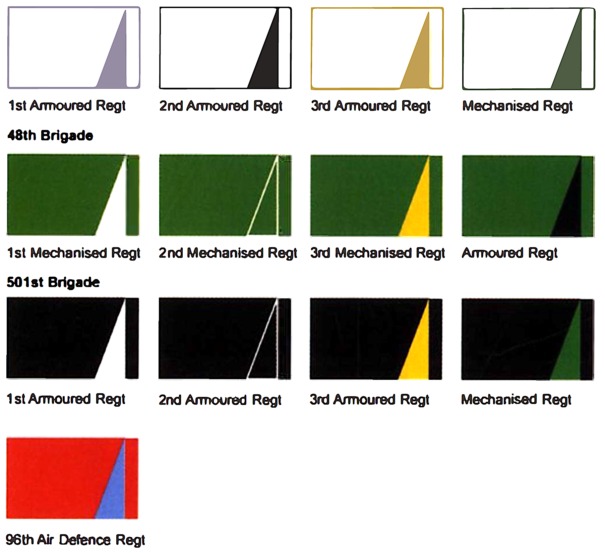
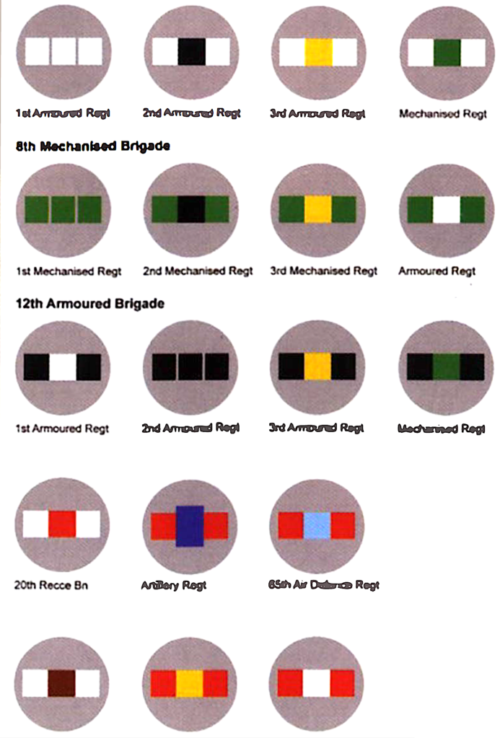
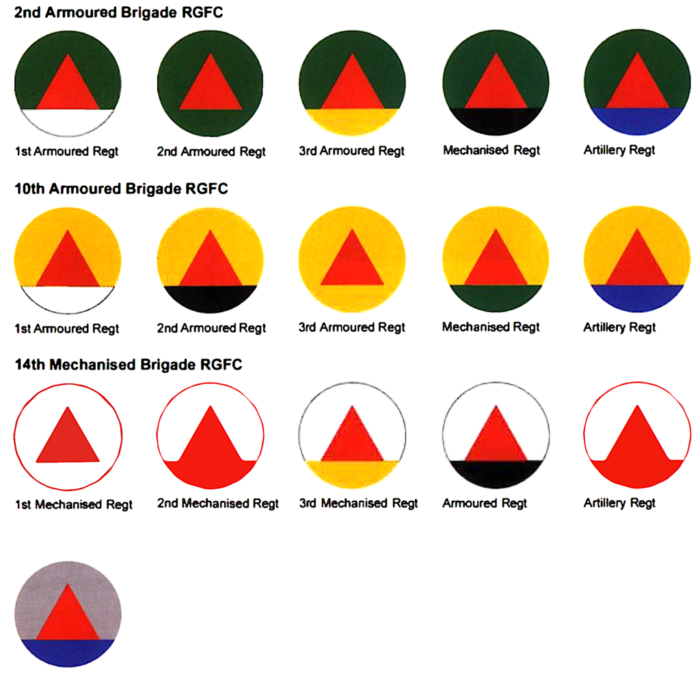
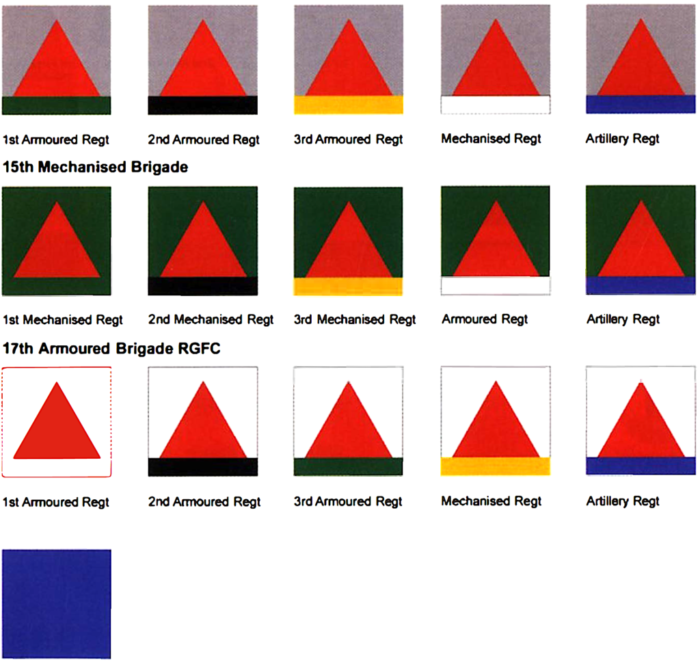
I have listed examples of some of the actual number plates recorded in Table 4. The other markings most frequently noted were the coloured geometric devices which allow the division, brigade and Wlit to be established, although it must be said that this was more standardized in theory than in practice. 171is system utilized coloured bars denoting seniority of similar brigades within divisions – white for the senior brigade, black or dark green for the second and yellow for the third. These bars can be seen either on the base of, or to the side of, the common brigade sign. Examples of various divisions and their component brigade signs are in Figures’ H to P. The use of a red triangle indicates a RG units, whereas the RA used mainly circles and rectangles, the latter often diagonally divided in a similar manner to the old British arm of service markings.

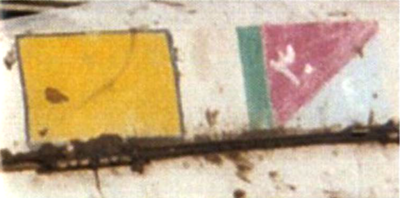
The approximate size of these devices on tanks was about 15in x 15in (375mm x 375mm), and about 12in x 12in (300mm x 300mm) on APCs and IFVs. It has to be stressed that this varied widely in practice, and also that the quality of the artwork was often shoddy, bordering on the awful. (So if your hand-painting skills are dodgy, don’t worry!) Weathering also took its toll, so the signs were frequently very muted and their positioning on the vehicles differed, even within units. On tanks, the designs were mostly painted on the turret sides; on T-55, T-59, T-62 and T-69s, the markings were generally to be found on both turret sides, either below the front handrail, or below the gap between the rear of the front handrail and the front of the rear handrail. (Photo A). With the T-72s, it was almost always immediately behind and level with the smoke grenade dischargers.



Tanks that had the additional spaced or reactive armour (generally the regimental commanders) did not carry the markings. On APCs and lFVs, the sign was usually painted on the hull sides, between a third to half-way along from the painted onto them. In the case of plain barrels – especially BMP-1, the colours were applied directly to the muzzle end of the barrel. The RA fll Corps’ 3rd Armoured Division definitely used this system, and examples from this division and a few others have been identified. It is not clear if the origin of these markings was battlefield recognition (my bet) or parade ‘bull’ – the towing eyes of many vehicles, and even sometimes the mudguards, were painted either yellow or (more often) red, presumably from a parade in the past.



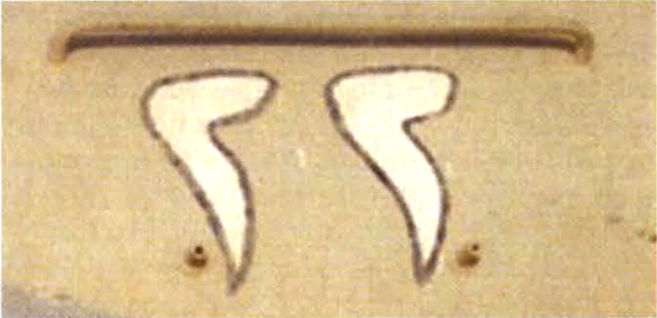
The 2nd Company used the same system, but caJl signs started with ‘2’ and the 3rd Company used callsigns starting with ‘3’. (Some RG units reorganized their 4th platoons into a fourth company, the callsigns beginning with ‘4’). I believe that as three-digit callsigns were seen, and the last digit was almost never higher than a ‘3’, the third digit replaced the letter -thus 11 became 111, 12B became 123, etc. In the majority of cases the callsigns were large Arabic numerals in a variety of styles and colours, but Western script has also been reported, though not confirmed. The size of these numerals varied as well, but remember that vehicle callsigns have to be painted on fairly large, as they need to be readable from a distance.
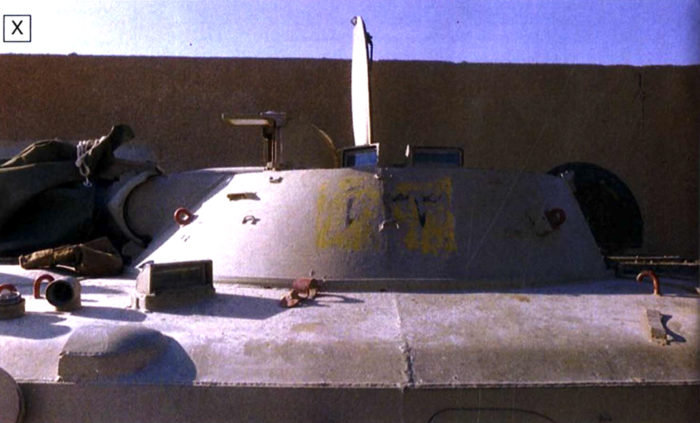
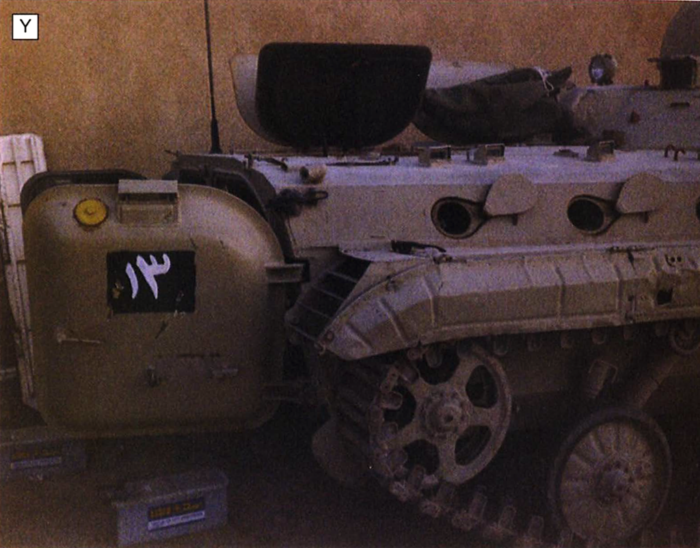
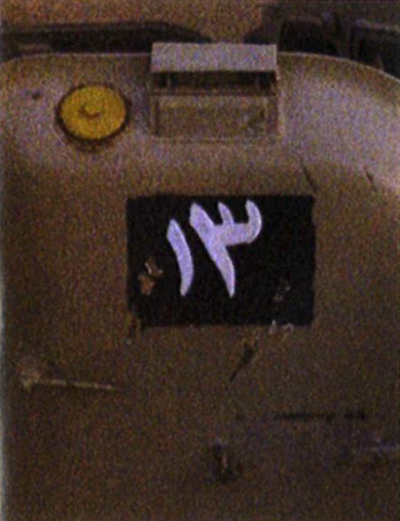
The call signs were sometimes painted directly onto the camouflage colour, but mostly onto white, yellow, black, or occasionally red, squares or circles to give better contrast. (Photos T to X). BMPs often had the callsign repeated on one of the rear doors. (Photo Y). Ambulances had the Red Crescent symbol prominently marked on all sides, but in a large white circle rather than the square used generally on Western Red Cross vehicles. A lot of ambulances, however, had the white circle, but with no crescent symbol inside. It is not clear if the crescent had never been painted in, or had been deliberately over painted later. A final interesting marking that diorama builders might be interested in was the unit designations to be seen painted onto captured ‘trophy’ vehicles by Coalition forces, in order to identify that they had been claimed and were to be taken back with the unit. British examples were ’14/20H’, ’16/SL C SQN’, and ‘3ACR’.
These markings were very roughly applied and often the Coalition upward-pointing chevron was also applied. I can visualize an Accurate Armour Commander tank transporter with the Tamiya T-55 thus painted as the load –
‘mouth-watering!’ In Part Two in the next issue, I shaJI look at the vehicle camouflage schemes used by the Iraqi ground forces, and review the markings in use in 2003. ■ Military Modelling Vol.35 No.8 2005

The call signs were sometimes painted directly onto the camouflage colour, but mostly onto white, yellow, black, or occasionally red, squares or circles to give better contrast. (Photos T to X). BMPs often had the callsign repeated on one of the rear doors. (Photo Y). Ambulances had the Red Crescent symbol prominently marked on all sides, but in a large white circle rather than the square used generally on Western Red Cross vehicles. A lot of ambulances, however, had the white circle, but with no crescent symbol inside. It is not clear if the crescent had never been painted in, or had been deliberately over painted later. A final interesting marking that diorama builders might be interested in was the unit designations to be seen painted onto captured ‘trophy’ vehicles by Coalition forces, in order to identify that they had been claimed and were to be taken back with the unit. British examples were ’14/20H’, ’16/SL C SQN’, and ‘3ACR’.
These markings were very roughly applied and often the Coalition upward-pointing chevron was also applied. I can visualize an Accurate Armour Commander tank transporter with the Tamiya T-55 thus painted as the load – ‘mouth-watering!’
In Part Two in the next issue, I shaJI look at the vehicle camouflage schemes used by the Iraqi ground forces, and review the markings in use in 2003. ■ Military Modelling Vol.35 No.8 2005
By kind permission of Doolittle Media. Originally published in Military Modelling


