Converting Historex
by TERRY BEDDIS
A SIMPLE TO BUILD FIGURE OF AN 1898 POST OFFICE RIFLES PRIVATE.
(A Historex conversion with the beginner in mind.)
MANY PEOPLE have asked me how I became hooked on modelling H istorex figures. Therefore, I thought it may also be of interest to readers to know how I was bitten by ‘the bug’. Up to 1965 I had been merrily modelling plastic planes. boats, cars. etc. Completely unaware that model :,oldiers existed (metal or otherwise). Then the Airfix Magazine wrote their first revue of the Historex figures which, as I read it, aroused my interest; but when I came to the address where these figures could be obtained, the matter was clinched. For lo and behold, Historex agents were no more than two minutes· walk from my home! I was round there like a shot, and being greeted very pleasantly by Lynn Sangster, who took me downstairs to his ‘den’ where I was surrounded by shelves of gaily-painted soldiers. all done by the master himself.
I was given a foot figure, paints and a coloured plate, and told to try my hand before paying out on something which may prove to be money wasted. I thanked him and returned home to set to work on my first model soldier. He was completed in a day and, to my mind, perfect. I rushed round to Lynn’s to show off my masterpiece where I was promptly ‘shot down in flames’; Lynn pointed out so many mistakes that I am sure they would have filled a telephone directory. For the next six months I was to come under Lynn’s personal supervision, taking up literally weeks of his spare time, learning the little tricks of the trade that make all the difference to the finished model. I then moved to Oxford and joined what I consider to be the most progressive branch in the country of the British Model Soldier Society. The Ox., Bucks., and Berks. Branch where I am pleased to say I was able to pass on some of my knowledge gained with the enormous help of Lynn Sangster, a man to whom I will always be entirely grateful.
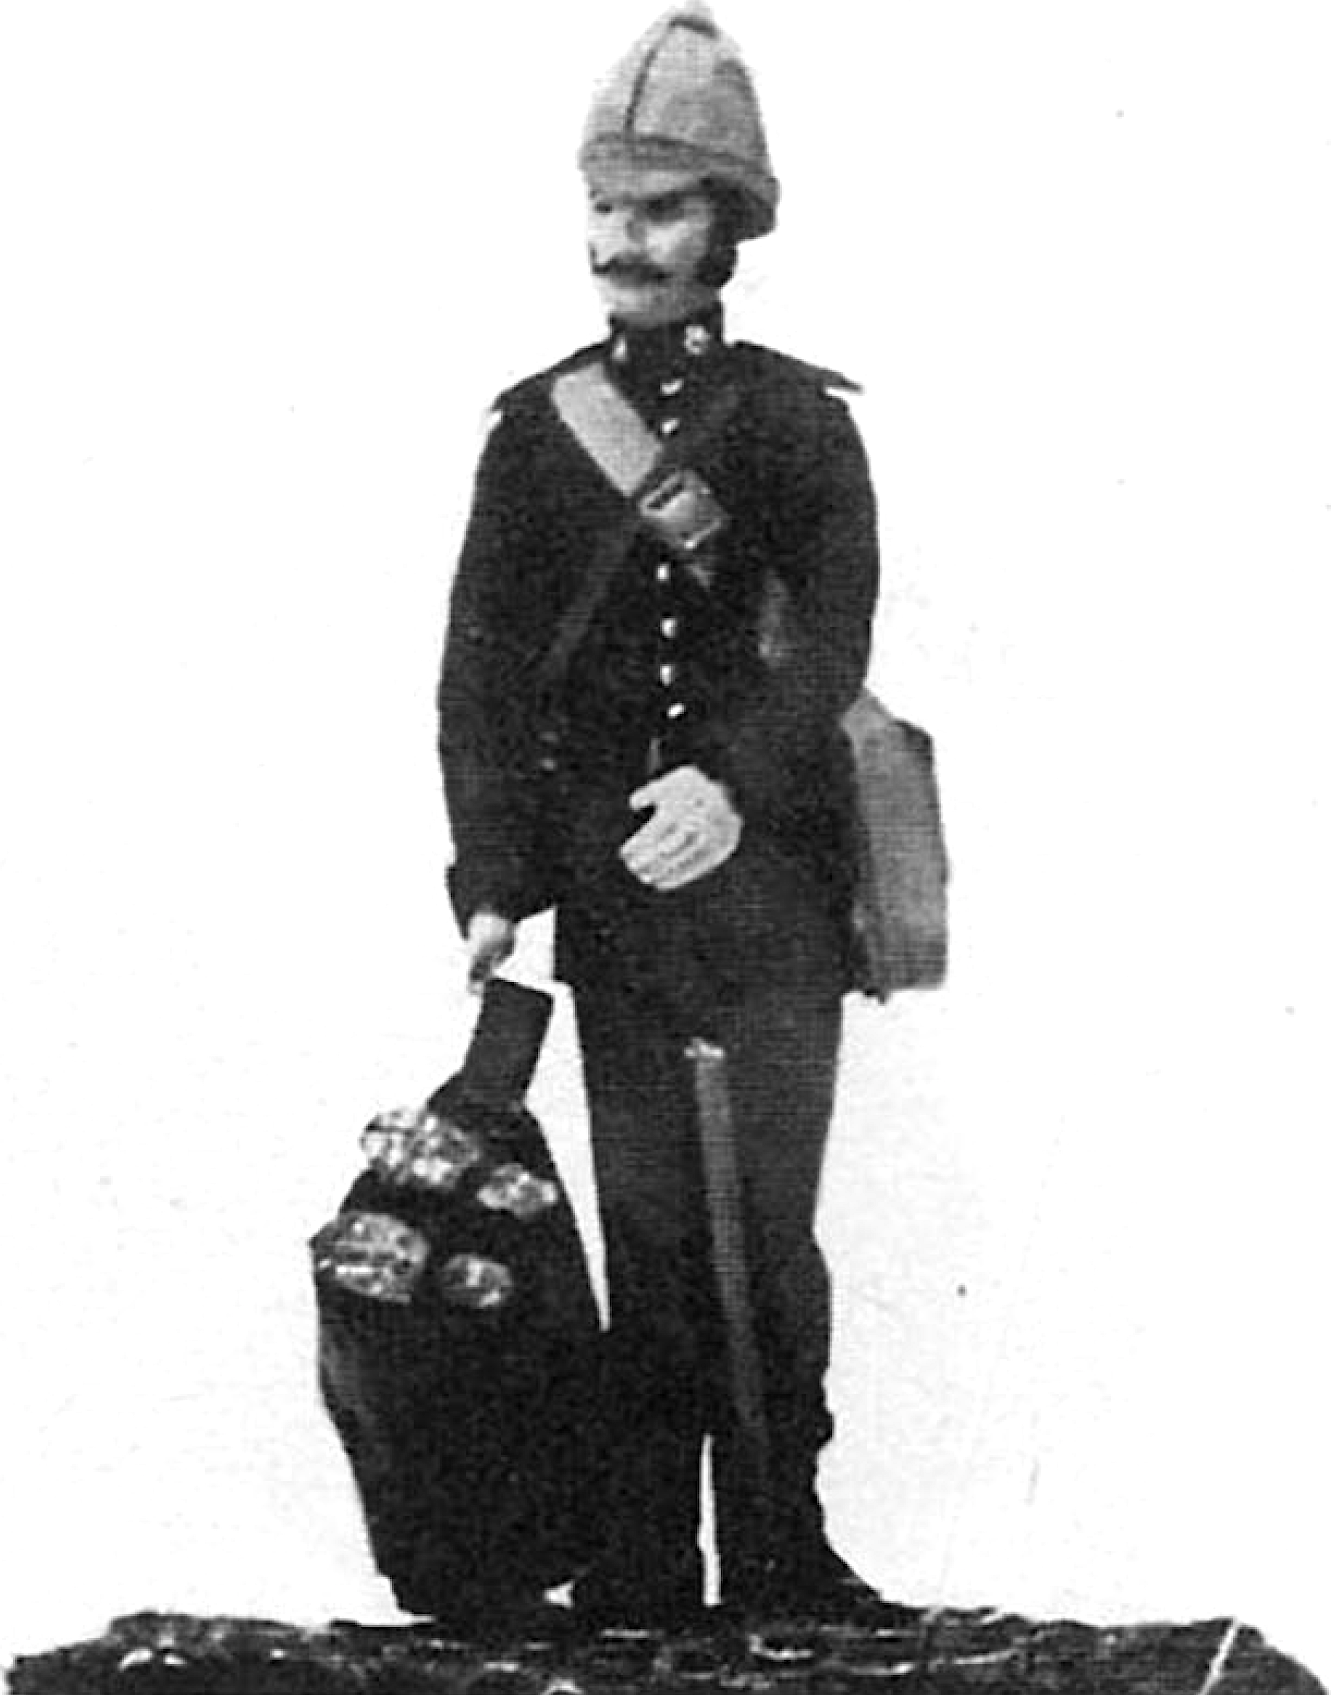
Post Office Rifles
Nowadays most modelling magazines contain articles concerned with conversions of some kind or other. But more often than not, one has to be gifted with a considerable amount of modelling skill to obtain satisfactory results. I am sure there are many readers who model the Historex range of figures who would like to try their hand at conversion work, but feel they lack the necessary skill. So it is with these readers in mind that this short series has been written which deals with simple but interesting conversions designed specifically for the beginner.
Yeomanry Private Post Rifles Egypt 1898
Historex Parts required Cat. No.
Infantryman’s Body 39
2 pairs of gaitered legs (Attn)
1 pkt. Assorted arms (op)
Dragoon’s Helmet Epaulettes
Rolled Greatcoat
Head with moustache
6 strap buckles
Infantry pouches
Ornaments for heavy cavalry materials required
Roll of Sellotape (coloured)
.005 Plastic Card
Plasticine
Balsa Wood Method of Assembly
Method of Assembly
All mould lines are scraped away prior to assembly.
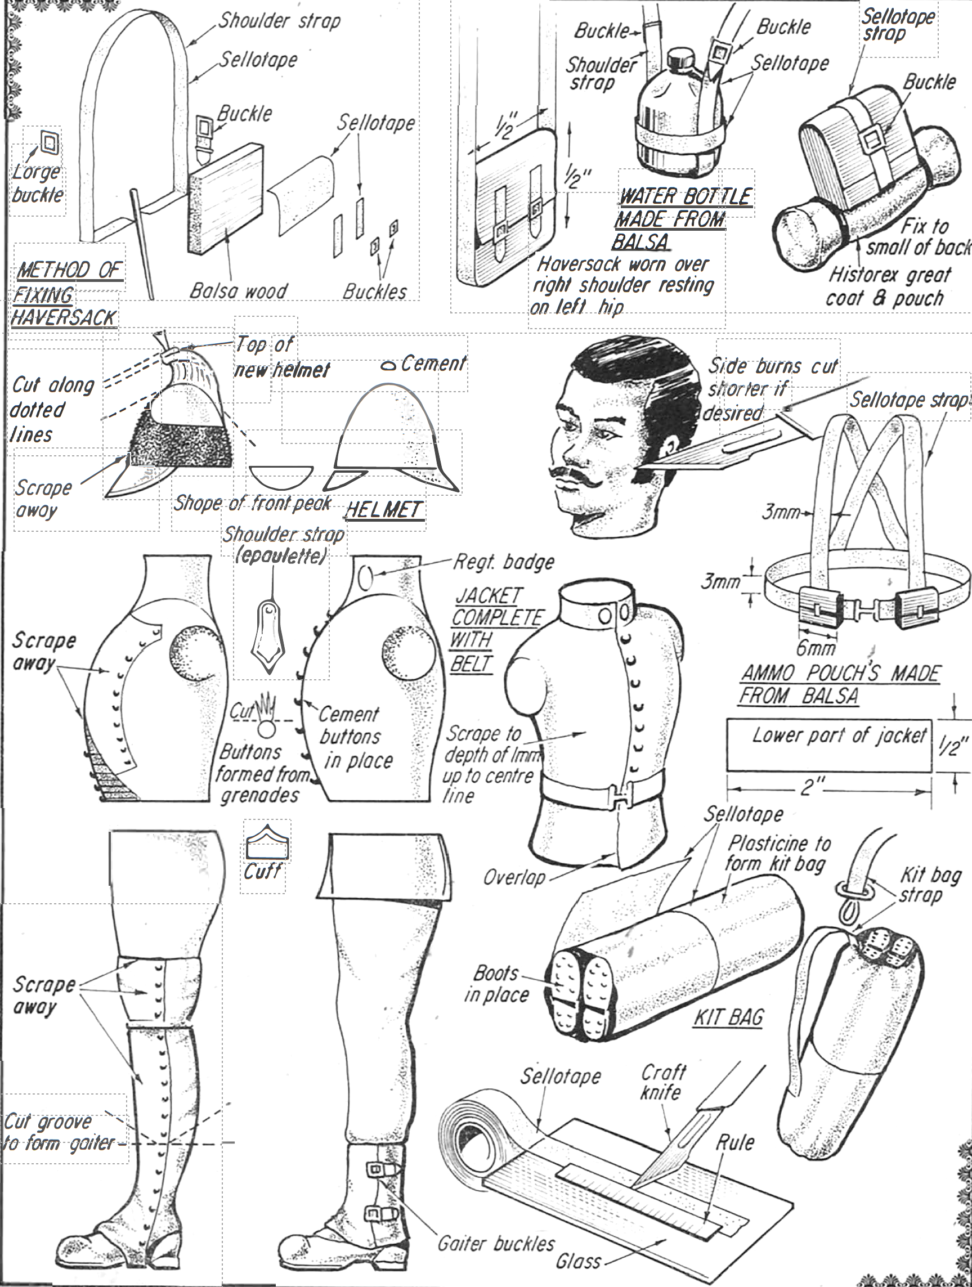
Legs With a sharp craft knife, first scrape away the buttons down the side of each of the gaiters. Then about half-way down the shin cut a ‘V’-shaped groove completely round the leg. This represents the trousers tucked into the gaiters ( see illustrations) and now scrape away the rest of the gaiter above the groove. The legs should now be cemented together, then to the base and the base to a cotton reel (this eliminates handling when painting). From the plastic sprue which contains ornaments of horse furniture, cut four small buckles and attach two to the outside of each gaiter. ( See illustration).
The Body
This is treated much the same way as the legs. All buttons first being scraped away. Then the lapels and vest are scraped smooth. When you are satisfied that no trace of the lapels or vest is showing, with the point of the craft knife make a line from the top of the body to the bottom, down the centre. Now scrape away the right-hand side of the body to the depth of 1 m.m. This forms the overlap at the front of the jacket.
The body is now cemented to the top of the legs. Now cut a sheet of .005 plastic card; the lower part of the jacket. This is approx. ½ in. wide and 2 in. in length. Wrap it around the hips of your figure and cement in place. When cementing plastic card, remember to use liquid cement (Mekpak or similar}; overlap at the front, the left. hand side over the right (see illustration}.
Don’t worry if your join line has a gap, as this is hidden by the waistbelt which is now put on. This, I made from coloured Sellotape but plastic card, or indeed paper, may be used if desired. For cutting Sellotape, I use an old piece of glass as a base, the tape being placed on the glass and with a steel rule acting as a guide, the tape is cut to the desired width. In the case of the waistbelt, 3 mm. wide and 2 in. in length which is wrapped around the waist covering the join line of the jacket.
The buttons are now tackled; there are several methods of making these. Small blobs of cement, the base of turnback grenades, buttons from the lapels can be cut off and kept until desired – or perhaps you have your own method. Whatever method you use you will need six small buttons and two large ones to act as collar badges, which are cemented in place after the head is attached.
Arms
The position of the arms is, of course, your own choice, but remember, hands can be cut off and new ones cemented in place which can enhance your figure, particularly if the hands used are the holding type. Mine are both from a mounted figure, the right one normally holding a sword and the left the reins. The cuffs which are the pointed type are now cemented in place. The Head If desired, the sideburns of the head can be cut to a shorter length and new ears may also be cut from plastic card and cemented in place. The collar badges are also put on at this stage.
Helmet
The crest of the dragoon’s helmet is carefully cut off and the base of the porn-porn (see illustration} which is put to one side. Now the fur which surrounds the helmet is scraped away till smooth. Cement the base of the porn-porn to the top of the helmet. The front peak of the helmet becomes the back one and a new front one is cut from plastic card and cemented in place ( see illustration}.
Straps and Equipment
I made all straps from Sellotape, but plastic card may also be used. For positioning of straps study the photograph and line drawings and place them in position. The ammo pouches and haversack arms are made from balsa wood; all buckles are from horse furniture and pouch lauckles (large}. The water bottle is made from balsa wood.
The epaulettes are now cemented in place. The infantry-man’s greatcoat and Pouch are cemented to the small of the back (see illustration}, Spare boots are cut from spare legs.
Kit bag
This is made by rolling a strip of Plasticine to the desired shape and covering with Sellotape; the kit-bag strap is also cut from Sellotape, the strap buckle is from heavy cavalry ornaments. The boots are placed in the top of the kit-bag. The rifle is from the crew of the Airfix W.W.I ‘Old Bill Bus’.
Painting Instructions
Dark blue jacket with medium green collar, cuffs and shoulder straps. The trousers are dark grey.
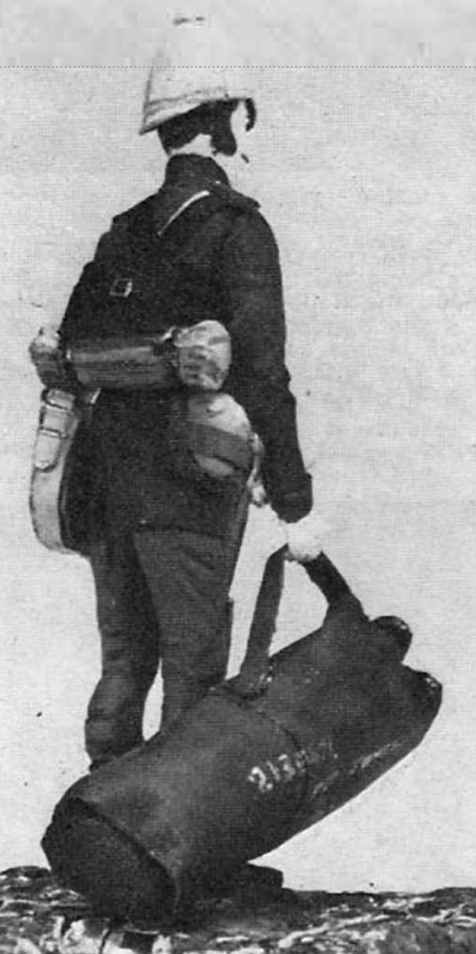
boots and gaiters black, all leather is black, the helmet is buff as is the haversack.
The water bottle is grey with a brown strap and the kit-bag is dark green. Spare boots have leather bottoms and studs. Buttons are silver, all buckles are brass, rifle strap is buff. The cobblestone base is made from Plasticine, painted a suitable colour.
I feel there is enough work to keep readers modelling until next month’s part two which will deal with a private of the British Army in the winter of 1914-15 at Flanders and ‘The Intruder·.

